Starting Now: iLoveCoding courses are completely FREE. No login or signup required.

HTML Elements - Continued

...Continuation of the lesson on HTML Elements.

FREELevel: Beginner3:36 mins
Course content
Lessons #1: Tools you need for the HTML/CSS course FREE
1:59 mins
Lessons #2: Overview of the VS Code Text Editor FREE
4:57 mins
Lessons #3: Code your first webpage FREE
3:59 mins
Lessons #4: What is HTML Really? FREE
3:16 mins
Lessons #5: What does HTML look like? FREE
2:46 mins
Lessons #6: HTML Elements FREE
7:20 mins
Lessons #7: HTML Elements - Continued FREE
3:36 mins
Lessons #8: Common HTML Elements (Cheatsheet included) FREE
3:26 mins
Lessons #9: HTML is a forgiving language FREE
3:47 mins
Lessons #10: Basic Markup of HTML FREE
5:18 mins
Lessons #11: The <h1>...<h6>, <i> and <strong> elements FREE
5:18 mins
Lessons #12: Learn to link webpages via the anchor <a> element FREE
4:04 mins
Lessons #13: Relative vs Absolute Paths - linking continued FREE
5:50 mins
Lessons #14: <div> and <span> elements FREE
6:36 mins
Lessons #15: Making lists in HTML via <ul>, <ol> and <li> elements FREE
5:36 mins
Lessons #16: Making nested lists + Homework FREE
4:31 mins
Lessons #17: Adding special characters in your webpage FREE
5:50 mins
Lessons #18: Emmet shortcuts and code comments FREE
3:37 mins
Lessons #19: <meta> elements and what they are about FREE
3:19 mins
Lessons #20: <meta> description and keyword elements for SEO FREE
3:33 mins
Lessons #21: <blockquote> and <pre> elements for special text formatting FREE
5:43 mins
Lessons #22: Adding images with the <img> element FREE
5:11 mins
Lessons #23: Using <video> and <audio> elements FREE
5:56 mins
Lessons #24: Semantic Elements + Homework FREE
4:26 mins
Lessons #25: Intro to CSS - Making the webpages beautiful FREE
4:22 mins
Lessons #26: Intro to CSS continued FREE
4:10 mins
Lessons #27: <style> element & using CSS selectors FREE
5:38 mins
Lessons #28: Organize your CSS is its own file FREE
4:55 mins
Lessons #29: CSS id selector (# hash sign) FREE
4:20 mins
Lessons #30: CSS class selector (. dot sign) FREE
3:52 mins
Lessons #31: Select all elements with asterisk (*) selector FREE
0:58 mins
Lessons #32: Using multiple selectors together (using comma and more) FREE
4:40 mins
Lessons #33: CSS Combinators selectors (~ + > etc.) FREE
7:50 mins
Lessons #34: Pseudo Selectors (:visited: :hover :active :focus) FREE
6:04 mins
Lessons #35: Chrome Developer Tools - Intro FREE
6:43 mins
Lessons #36: Colors in CSS FREE
3:19 mins
Lessons #37: Apply multiple CSS classes + write notes with code comments FREE
2:59 mins
Lessons #38: Fonts: Change & add custom fonts FREE
6:20 mins
Lessons #39: Background CSS Property. Change color, images and more FREE
7:39 mins
Lessons #40: Common CSS Units - (px, em, rem, %) FREE
7:01 mins
Lessons #41: Common CSS Units - (rem) FREE
2:39 mins
Lessons #42: CSS Margin and Padding FREE
9:49 mins
Lessons #43: CSS border property FREE
4:00 mins
Lessons #44: CSS border style FREE
2:05 mins
Lessons #45: Size elements with 'width' and 'height' property FREE
3:21 mins
Lessons #46: Use 'box-sizing' for more control on element sizing FREE
3:43 mins
Lessons #47: 'border-radius' Curve borders and make custom shapes. FREE
7:58 mins
Lessons #48: <div> vs <span> the real difference FREE
4:36 mins
Lessons #49: Using 'display' property of CSS & 'inline-block' FREE
3:19 mins
Lessons #50: 'float' & 'clear' property - Moving elements around. FREE
4:38 mins
Lessons #51: Hide content with `overflow`, `visibility` and `display` property FREE
3:36 mins
Lessons #52: Clearfix: Hack to fix webpage spacing issue FREE
3:51 mins
Lessons #53: Project: Blog Design - Create beautiful looking website FREE
5:20 mins
Lessons #54: Project: Blog Design (Part 2/7) - Layout the HTML FREE
9:09 mins
Lessons #55: Project: Blog Design (Part 3/7) - Styling the header FREE
4:01 mins
Lessons #56: Project: Blog Design (Part 4/7) - Styling main and footer area FREE
4:02 mins
Lessons #57: Project: Blog Design (Part 5/7) - Styling sidebar FREE
3:10 mins
Lessons #58: Project: Blog Design (Part 6/7) - Styling articles FREE
2:17 mins
Lessons #59: Project: Blog Design (Part 7/7) - Additional Pages FREE
5:13 mins
Lessons #60: 'position' - Control element position within your page FREE
8:10 mins
Lessons #61: Project: Coupon (using `absolute` & `relative` position) FREE
5:21 mins
Lessons #62: CSS Flexbox & CSS Grid - More layout methods FREE
3:02 mins
Lessons #63: CSS Priority Order FREE
6:04 mins
Lessons #64: Additional Resources - Codepen + HTML Cheatsheet FREE
5:18 mins
Lessons #65: <table> Making tables in HTML FREE
5:32 mins
Lessons #66: <table> Making tables in HTML continued FREE
2:41 mins
Lessons #67: <iframe> Embedding other webpages in your webpage FREE
4:16 mins
Lessons #68: Creating forms and understanding how they work FREE
11:17 mins
Lessons #69: Creating form - continued FREE
6:41 mins
Lessons #70: Using external CSS libraries in your projects FREE
6:42 mins
Lessons #71: Conclusion and next steps FREE
3:28 mins
πŸ˜‡Important: This course is FREE and always will be πŸ™Œ. Feel free to share it with friends. 🎁

HTML Cheatsheet

CSS Cheatsheet

HTML CSS Cheatsheet thumb


Lesson Transcript

There is just one more thing you need to know about HTML elements syntax, and that is in the cheat sheet. So if you simply scroll down, that is the last rule, and that is that some elements do not have a closing tag but they are self-closing.

The general rule for HTML elements is that they have a closing tag. But some exceptions like <img>, <br>, <hr>, <meta>, and <input>, do not have closing tags and hence, do not have children elements.
They usually follow this format:

<name attribute="value"/>

the / denotes that it is a self-closing tag.

The <br /> tag

The <br> tag basically is a line-break (br stands for break row). If you want to have a space between 2 paragraphs for example, you need to use a <br> tag. Just manually trying to do this by pressing enter won't have any results in your web page, the same works for multiple spaces. See this example:

<p id="first-para">
  this is the text       for the paragraph.
  <span>
    this is some more text
  </span>
  <span>
    sadjalsdkjsa
  </span>
</p>

The code above will result in this:
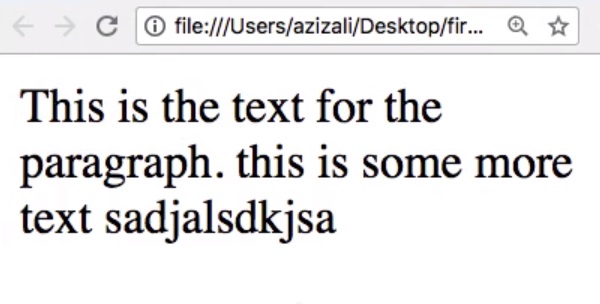
example before using <br /> element

We can clearly see that all the extra spacing and the new lines do not have any effect. For jumping to a new line we use the <br />. For this example, we want to start the span text in a new line, and have a blank line between them. So we add two br tags and the code looks like this:

<p id="first-para">
  this is the text       for the paragraph.
  <br />
  <br />


  <span>
    this is some more text
  </span>
  <span>
    sadjalsdkjsa
  </span>
</p>
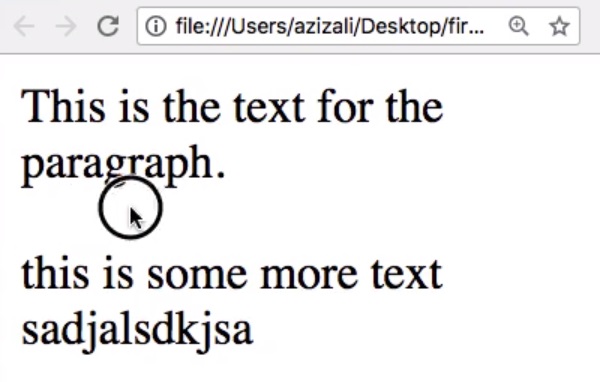
example of <br /> element usage

As you can see in the example above, after we use the <br /> the vertical spacing was applied.

The <hr /> tag

If we want to define a line to separate content or to define a thematic break, we can use the <hr /> tag, which stands for horizontal rule. It makes a horizontal line across the screen which is very useful to separate the content visually. Let's use it in our example:

<p id="first-para">
  this is the text       for the paragraph.
  <br />
  <br />
  <hr />


  <span>
    this is some more text
  </span>
  <span>
    sadjalsdkjsa
  </span>
</p>

Here we can see the result:
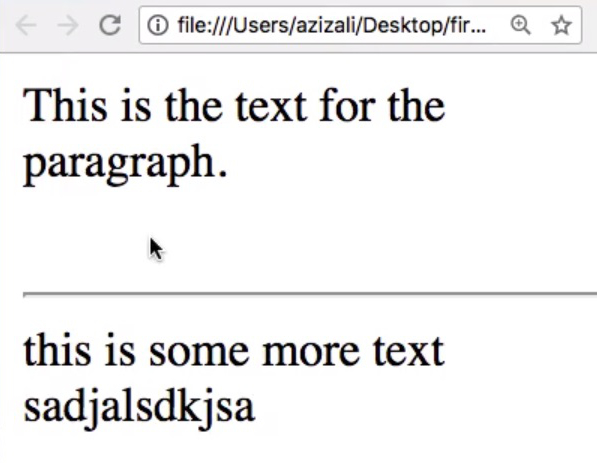
example of <hr /> element usage

One last thing to know about HTML elements, is that one single element can have multiple attributes. like <img id="first-img" class="myclass" alt="my first image" />, but it won't have any effects visually since they are not meant for it. We will learn more about this in future lessons.

Become a confident software developer with mentor support!
Get Started
Already have an account? Please Login