Starting Now: iLoveCoding courses are completely FREE. No login or signup required.

HTML is a forgiving language

Your code will work even if you write incorrect code - but it has limits. Lets see.

FREELevel: Beginner3:47 mins
Course content
Lessons #1: Tools you need for the HTML/CSS course FREE
1:59 mins
Lessons #2: Overview of the VS Code Text Editor FREE
4:57 mins
Lessons #3: Code your first webpage FREE
3:59 mins
Lessons #4: What is HTML Really? FREE
3:16 mins
Lessons #5: What does HTML look like? FREE
2:46 mins
Lessons #6: HTML Elements FREE
7:20 mins
Lessons #7: HTML Elements - Continued FREE
3:36 mins
Lessons #8: Common HTML Elements (Cheatsheet included) FREE
3:26 mins
Lessons #9: HTML is a forgiving language FREE
3:47 mins
Lessons #10: Basic Markup of HTML FREE
5:18 mins
Lessons #11: The <h1>...<h6>, <i> and <strong> elements FREE
5:18 mins
Lessons #12: Learn to link webpages via the anchor <a> element FREE
4:04 mins
Lessons #13: Relative vs Absolute Paths - linking continued FREE
5:50 mins
Lessons #14: <div> and <span> elements FREE
6:36 mins
Lessons #15: Making lists in HTML via <ul>, <ol> and <li> elements FREE
5:36 mins
Lessons #16: Making nested lists + Homework FREE
4:31 mins
Lessons #17: Adding special characters in your webpage FREE
5:50 mins
Lessons #18: Emmet shortcuts and code comments FREE
3:37 mins
Lessons #19: <meta> elements and what they are about FREE
3:19 mins
Lessons #20: <meta> description and keyword elements for SEO FREE
3:33 mins
Lessons #21: <blockquote> and <pre> elements for special text formatting FREE
5:43 mins
Lessons #22: Adding images with the <img> element FREE
5:11 mins
Lessons #23: Using <video> and <audio> elements FREE
5:56 mins
Lessons #24: Semantic Elements + Homework FREE
4:26 mins
Lessons #25: Intro to CSS - Making the webpages beautiful FREE
4:22 mins
Lessons #26: Intro to CSS continued FREE
4:10 mins
Lessons #27: <style> element & using CSS selectors FREE
5:38 mins
Lessons #28: Organize your CSS is its own file FREE
4:55 mins
Lessons #29: CSS id selector (# hash sign) FREE
4:20 mins
Lessons #30: CSS class selector (. dot sign) FREE
3:52 mins
Lessons #31: Select all elements with asterisk (*) selector FREE
0:58 mins
Lessons #32: Using multiple selectors together (using comma and more) FREE
4:40 mins
Lessons #33: CSS Combinators selectors (~ + > etc.) FREE
7:50 mins
Lessons #34: Pseudo Selectors (:visited: :hover :active :focus) FREE
6:04 mins
Lessons #35: Chrome Developer Tools - Intro FREE
6:43 mins
Lessons #36: Colors in CSS FREE
3:19 mins
Lessons #37: Apply multiple CSS classes + write notes with code comments FREE
2:59 mins
Lessons #38: Fonts: Change & add custom fonts FREE
6:20 mins
Lessons #39: Background CSS Property. Change color, images and more FREE
7:39 mins
Lessons #40: Common CSS Units - (px, em, rem, %) FREE
7:01 mins
Lessons #41: Common CSS Units - (rem) FREE
2:39 mins
Lessons #42: CSS Margin and Padding FREE
9:49 mins
Lessons #43: CSS border property FREE
4:00 mins
Lessons #44: CSS border style FREE
2:05 mins
Lessons #45: Size elements with 'width' and 'height' property FREE
3:21 mins
Lessons #46: Use 'box-sizing' for more control on element sizing FREE
3:43 mins
Lessons #47: 'border-radius' Curve borders and make custom shapes. FREE
7:58 mins
Lessons #48: <div> vs <span> the real difference FREE
4:36 mins
Lessons #49: Using 'display' property of CSS & 'inline-block' FREE
3:19 mins
Lessons #50: 'float' & 'clear' property - Moving elements around. FREE
4:38 mins
Lessons #51: Hide content with `overflow`, `visibility` and `display` property FREE
3:36 mins
Lessons #52: Clearfix: Hack to fix webpage spacing issue FREE
3:51 mins
Lessons #53: Project: Blog Design - Create beautiful looking website FREE
5:20 mins
Lessons #54: Project: Blog Design (Part 2/7) - Layout the HTML FREE
9:09 mins
Lessons #55: Project: Blog Design (Part 3/7) - Styling the header FREE
4:01 mins
Lessons #56: Project: Blog Design (Part 4/7) - Styling main and footer area FREE
4:02 mins
Lessons #57: Project: Blog Design (Part 5/7) - Styling sidebar FREE
3:10 mins
Lessons #58: Project: Blog Design (Part 6/7) - Styling articles FREE
2:17 mins
Lessons #59: Project: Blog Design (Part 7/7) - Additional Pages FREE
5:13 mins
Lessons #60: 'position' - Control element position within your page FREE
8:10 mins
Lessons #61: Project: Coupon (using `absolute` & `relative` position) FREE
5:21 mins
Lessons #62: CSS Flexbox & CSS Grid - More layout methods FREE
3:02 mins
Lessons #63: CSS Priority Order FREE
6:04 mins
Lessons #64: Additional Resources - Codepen + HTML Cheatsheet FREE
5:18 mins
Lessons #65: <table> Making tables in HTML FREE
5:32 mins
Lessons #66: <table> Making tables in HTML continued FREE
2:41 mins
Lessons #67: <iframe> Embedding other webpages in your webpage FREE
4:16 mins
Lessons #68: Creating forms and understanding how they work FREE
11:17 mins
Lessons #69: Creating form - continued FREE
6:41 mins
Lessons #70: Using external CSS libraries in your projects FREE
6:42 mins
Lessons #71: Conclusion and next steps FREE
3:28 mins
πŸ˜‡Important: This course is FREE and always will be πŸ™Œ. Feel free to share it with friends. 🎁

HTML Cheatsheet

CSS Cheatsheet

HTML CSS Cheatsheet thumb

Video Lesson Transcript

Now one important fact that I want to mention to you, is that HTML is a very forgiving language. That means that if you break the syntax and if you write incorrect code let's say by avoiding the closing </p> tag and miss the closing </span> tag, this is how it should look.

<p id="first-para" class="info">
  This is the text          for the paragraph.
  <br />
  <br />
  <hr />


  <span id="whatever" class="something else">
    this is some more text
  </span>
  <span>
    sadjalsdkjsa
result of a broken HTML code

Sometimes it is going to totally break, but sometimes is going to simply work. Right here I am missing the two closing tags, but still it's working.

So that's what I want to mention to you, that HTML is a very forgiving language. That means that when the browser reads the code, it tries it's best to understand it. And even if it's broken, it's gonna try to make sense of it, and render something on the screen to the best of it's knowledge.

With that said, I'm gonna right-click, and inspect the <p> element. Basically you've learned that the inspect feature will open all the code in the elements tab in the Chrome Developer Tools, and you immediately see that this is not the code that we wrote.

inspecting the broken HTML code

We never wrote the <html> element, neither the <head> or the <body> elements, we just wrote the code that goes inside the <body>.

So where is the rest of the code coming from? And that is what goes on to say that HTML is a very forgiving language. The browser interprets our code and fills in the gaps to make the webpage appear on the screen. Now, this does not mean that it's okay to make mistakes. It only means that a lot of times you may have made a mistake and you will not see an error on the screen.

Proper format of an HTML document

Now you see that so far you wrote all of these HTML elements, and these are the elements that shows up on the page.

But, the proper way to write an HTML page, is to have this particular basic markup.

<!DOCTYPE html>
<html lang="en">
  <head>
    <title>
      page title goes here
    </title>
  </head>

  <body>
    page content goes here
  </body>
</html>

You write an <html> element, and inside it you have two elements: the <head>, and the <body> elements.

<body>

The <body> one, will have everything that is shown in this area:

Showing <body> area in the page

This white area is the <body> of the HTML page.

<head>

in the <head> area, you write let's say the <title>. This is just one option, there are many others as well, but this is one of the thing that you write in the <head> section.

What is <head>? It is the section which is like the options for the web page.

showing the title of the page

Where it says "index.html", you want to mention the title for that page, so you're going to put it inside the <title> element, and everything that you want to show inside that particular page, will go inside the <body> area.

Explaining the code from the inspector
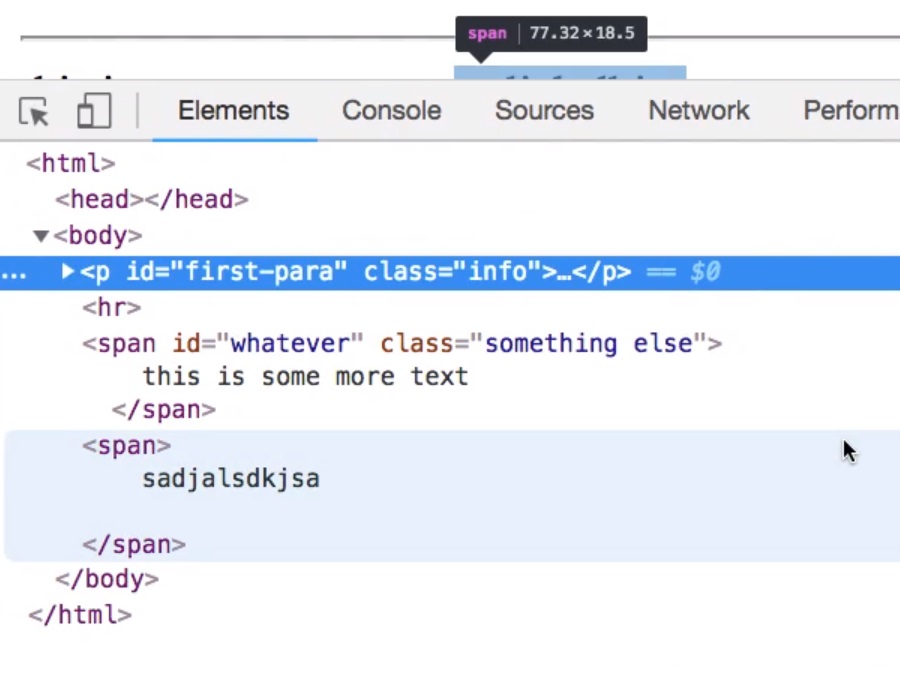
seeing the code from the inspector

Now with that said, you can see over here that the browser is smart enough to think "hey, these are some <p>, <hr>, and <span>, it looks like they fit inside the <body> area". So it just puts it automatically inside the <body> element. Smart enough, right?

Even though HTML is a forgiving language, if you break the rules too much, your code will not work in the way that you expect. So always be careful writing code, indent your code pretty well so it is easier for you to read, so you can have the proper result that you are expecting.

With that said, in the next lesson, we are going to go over this basic markup, and you're going to know basically the things that you need to know about HTML to get started. In the rest of the tutorials we are going to be focusing on the different elements one by one, and after that, we are going to get into the CSS.

So that's pretty much it for this lesson, I'll talk to you in the next.

Become a confident software developer with mentor support!
Get Started
Already have an account? Please Login